The Second Life of the Button Tin
Button tin sorting turns a jumble of saved fasteners into a useful household resource, with a simple weekly routine for matching buttons to likely jobs.
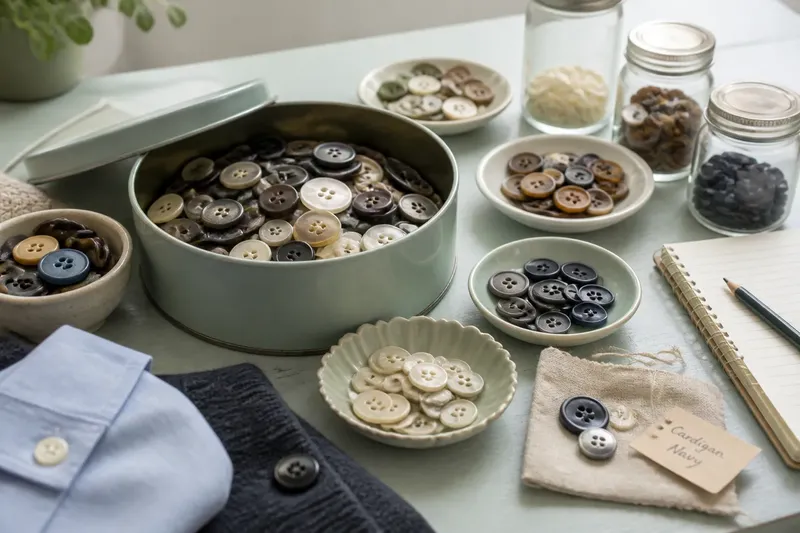
The button tin usually comes out when a shirt loses its last matching fastener. Button tin sorting makes that familiar rummage more useful: a little attention to size, fastening and likely purpose can turn saved odds and ends into a collection you can actually use. The tin’s second life begins with a quiet week, not a grand craft project.
Why buttons stayed
Buttons are small, durable and easy to keep. When a garment is worn out, its buttons may still be sound; when a replacement arrives, the spare can outlast the packet it came in. So household collections grow through ordinary decisions: cut off the usable buttons, keep the loose one, put the extras somewhere safe.
That habit makes sense, but a single tin can hide the useful from the merely familiar. A tiny shirt button may be perfect for a cuff and useless for a coat. A large, decorative button might suit a cushion cover but snag on a child’s cardigan. Sorting does not mean discarding every odd one. It means making the differences visible.
Day one: empty and notice
Choose a clear table, a shallow tray and a few small dishes. Tip out the tin and remove thread, lint, bent pins and anything that is not a button. Keep the work modest: the aim is to see what you have, not to create a museum catalogue.
As you handle each button, notice its size, number of holes, fastening and condition. Check whether the holes are clear and whether a shank—the loop on the back—sits firmly. Set aside cracked, sharp-edged or badly damaged pieces. If a button’s material or care needs are uncertain, treat it cautiously rather than pairing it with a garment that may be harmed.
Place the remaining buttons in a broad first sort: small, medium and large. The groups need not be exact. Their purpose is to stop a tiny fastener disappearing among heavy coat buttons.
Day two: sort by fastening
Within each size group, separate flat buttons with holes from shank buttons with a loop or raised attachment on the back. If you have buttons designed for a particular fitting, such as a covered button, keep those together too. The fastening affects how a button sits and how it can be sewn on, so shape is more than decoration.
Some buttons have two holes, others four. You can split those into separate dishes if the collection is large enough to make the distinction useful. If there are only a few, keep them in the same fastening group and let their shape remain visible.
Do not force a fussy system. A saucer, paper muffin cup or clean jar lid can hold a temporary group while you work.
Day three: add likely use
Now consider what each group could serve. Small, plain buttons may suit shirts, blouses or children’s clothes. Larger, sturdier ones may be candidates for coats, bags or craft projects. Decorative pieces might be saved for a visible repair or embellishment, while a matched set is worth keeping together for a garment that still needs it.
Make a small “matched sets” group before mixing anything else. A set can be more valuable as a set than as several loose buttons. If you remember the garment they came from, add a paper note; memory fades more quickly than a button’s colour.
Say you find a pair of dark, four-hole buttons that are close in size to the missing fastener on a plain cardigan. Put them in a “clothes—medium, flat” compartment and keep the cardigan’s remaining button nearby only if you can store it without tangling thread. The next time the cardigan needs attention, you can compare the pair before sewing, rather than searching the whole tin.
Day four: check the match
A likely use is not a promise of a perfect match. Compare a candidate with the garment in daylight. Look at diameter, thickness, colour, sheen and how the button passes through the buttonhole. Check that its weight suits the fabric and that a shank has enough room to sit comfortably.
For an everyday replacement, a close match may be enough. On a front placket where several buttons show, a mismatch can be conspicuous; consider replacing the visible set as a deliberate choice, or keep looking. For hidden fastenings, colour may matter less than a secure fit. The garment’s care label and the button or garment maker’s instructions can settle material or washing questions; local rules matter for disposal.
Day five: choose a container
Pick a container that suits the collection, rather than buying more storage by default. A divided tin, small screw-top jars or labelled envelopes can all work. Keep sharp pins and needles elsewhere, and avoid a container that makes small buttons spill into one another every time it is opened.
Labels should describe the useful distinction, not just the contents. “Small, two-hole” tells you more than “buttons”. For a tiny assortment, a few labelled paper packets inside the original tin may be plenty. Leave room for a new button or two; a system that is already packed tight is hard to maintain.
Keeping the system useful?
Should buttons stay with the garment?
Keep a spare with its garment when the set is distinctive or the button is an exact match. Otherwise, store it in the appropriate group and write down the garment name on a small note.
How many sorting groups are enough?
Start with size and fastening, then add a group only when it answers a real search problem. A small tin may need only a few compartments; a larger collection may benefit from separate groups for matched sets and decorative buttons.
What should happen to damaged buttons?
Remove pieces with sharp breaks, loose shanks or holes that have crumbled. Keep an unusual but intact button if you have a likely use for it, and dispose of unusable material according to local guidance.
When should the tin be checked again?
Revisit it when you add a batch of saved buttons or when a repair sends you searching through several groups. Return unused candidates to their labelled place instead of leaving them loose on a shelf.
Day seven: return and refine
At the end of the week, put the groups into their chosen container and place it where sewing supplies are already kept. The best location is one you can reach without unpacking another cupboard. Add a short note inside the lid if the labels need explanation.
Keep button tin sorting flexible. If you repeatedly search for one kind—perhaps small shank buttons—give that group its own compartment. If a category never helps, combine it with a neighbour. A button tin earns its second life through this modest loop: save sound pieces, sort for the decisions you make, and return each one where your future self can find it.