Patch or Darn: Two Ways to Mend a Small Fabric Tear
Patch or darn a small fabric tear by matching the repair to its shape and location, so the cloth gets support without an awkward, bulky finish.
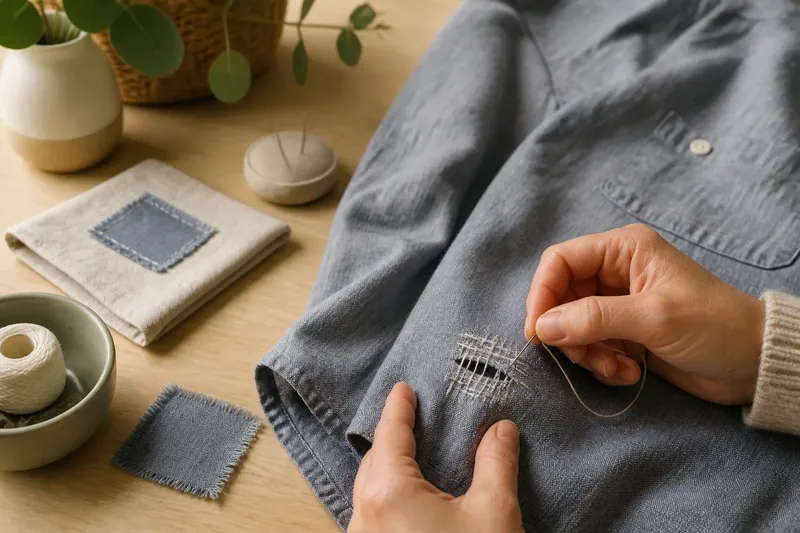
A small tear opens beside the pocket seam of a favourite shirt. You reach for the sewing tin, then pause: should you cover the gap with a patch, or weave thread through it? For a small fabric tear, the choice depends less on which repair looks clever and more on where the cloth has opened, how it moves, and what material you can sensibly add.
Read the opening
Lay the garment flat without pulling the torn edges together. A narrow slit, a ragged hole and a tear along a seam may look similar at first glance, but they ask for different support. Check the fabric on both sides of the damage, not just the gap itself. If the surrounding cloth is thin, shiny with wear or ready to fray, the repair needs to support that weakened area too.
A slit with edges that still meet naturally often suits darning. Darning uses thread to build a small woven bridge across the opening, anchoring it into sound cloth around the edges. It adds material in strands rather than laying a separate piece over the surface. A patch, by contrast, adds a distinct piece of fabric, either behind or on top of the tear.
Shape is a clue, not a rule. A small round hole can be awkward to close with a simple line of stitches, while an elongated slit may be easy to span with a patch. The fabric’s stretch and the garment’s use can change that judgement.
Before choosing, gently smooth the cloth and note the direction of its weave or stretch. Do not tug the tear wider to inspect it.
Thread across a slit
Darning is often a neat option for a small opening in woven cloth where the surrounding threads remain reasonably firm. It can suit a little tear on a shirt body, a lightweight trouser leg or a woven tea towel. The repair fills the gap with thread and attaches to the fabric around it, so the original cloth remains visible between the new strands.
For a basic woven darn, use a needle and thread that are close in weight to the fabric. A blunt-ended darning needle can help with looser knits, while a finer sewing needle is more manageable on closely woven cloth. Anchor the thread in sound material beyond one edge, then make parallel stitches across the opening, extending into sound cloth on either side. Turn the work and weave another set of threads across those lines, passing over and under them to form a small grid.
Keep the stitches close enough to bridge the opening, but do not draw them tight. Tension that puckers the cloth can make the mend uncomfortable and place extra strain at the edges. A slightly flexible web of thread is usually more useful than a hard knot of stitches.
Darning can be less suitable when the tear has removed a large piece of fabric, when the edges crumble under gentle handling, or when the damaged spot bears a lot of rubbing. A thread grid depends on sound cloth for its anchors. If those anchors are weak, the new weave may simply tug at the next fragile area.
For a stretch knit, use a method and thread that allow movement; a rigid woven grid may sit awkwardly. Match the repair to the fabric’s behaviour, not just its colour.
Give a patch an anchor
A patch is useful when the damaged area needs a broader support than a few crossing threads can provide. It may sit on the reverse of the garment for a quiet repair, or on the face as a visible detail. In either position, the patch should extend beyond the frayed opening onto fabric that can hold stitches.
Choose a piece with a compatible weight. A heavy canvas scrap on a fine blouse can make a stiff spot; a flimsy scrap under a worn knee may offer little support. Similar fabric is a sensible starting point, though a contrasting patch can be deliberate if the repair is meant to show.
Trim only loose fibres that catch or obscure the edge. Avoid cutting away sound cloth merely to make the hole look tidy. Place the patch so it lies flat without stretching the garment, then secure the opening and the patch together with small stitches around the damaged area. A running stitch or backstitch can work on woven cloth, while a stretch-friendly stitch may be better for jersey.
On a tear close to a seam, a patch can overlap the seam allowance or sit behind it, depending on access and the garment’s construction. Keep the seam’s original shape in view; an oversized patch that catches against the body can be more irritating than the tear. If the seam itself has opened, repairing that seam is a separate task from covering a hole beside it.
For a discreet mend, a patch on the inside can preserve the garment’s outer surface, though its edges may still be felt. A visible patch can be easier to inspect later and may suit workwear or play clothes. Neither placement is automatically stronger: sound anchoring and compatible cloth matter more.
Choose by location
Location tells you how much movement and friction the mend must tolerate. A tear on a loose shirt panel may barely rub against anything. One at an elbow, pocket corner or trouser seat is likely to flex or meet other surfaces often. In a high-friction spot, a patch can spread support over a wider area; darning may be preferable where a bulky layer would catch or feel uncomfortable.
Consider the garment from the wearer’s point of view. A mend inside a waistband may irritate skin. A patch across the bend of an elbow may limit movement if its fabric is too firm. On a pocket edge, the repair needs to avoid snagging whatever goes in and out. These details can outweigh the neatness of a stitch seen from a distance.
Imagine a small, straight tear on the side of a cotton shirt, away from a seam. The edges meet, and the cloth around them feels sound when laid flat. A fine thread darn could bridge the slit without adding a separate layer; the expected visible result is a small woven area that lets the shirt fabric remain the main surface.
Now imagine a ragged opening at the knee of a pair of trousers, with thinning cloth around it. A patch cut from a similarly weighted scrap could cover a wider area and give the stitches more sound fabric to hold. The expected result is a visible or hidden reinforced panel, depending on placement, rather than a thread grid alone.
Those are starting points, not recipes. A stretch fabric, a lined garment or a tear close to a delicate finish can call for another approach.
What should you choose?
Is darning better for a straight tear?
It can be, if the fabric edges remain sound and the opening is small enough for a thread weave to bridge. If the surrounding cloth is worn thin, a patch may spread the support more effectively.
When does a patch make more sense?
Consider one when the hole is irregular, the area around it needs reinforcement, or friction is likely to strain a small darn. Choose a compatible fabric and avoid placing a stiff layer where it will rub or restrict movement.
Can you patch from the inside?
Yes, an inside patch can keep the outer face simpler while supporting the tear. Check that its edges and stitches will not rub against skin or catch on layers beneath the garment.
Should the thread match exactly?
A close colour match can make a repair quieter, but thread weight and flexibility matter too. A contrasting thread can be a deliberate visible choice if it suits the garment and the stitches remain secure.
Prepare without enlarging
Before sewing, clean the area in the way the garment’s care label allows and let it dry. Dirt caught beneath a patch can be unpleasant to work through, and damp fabric may behave differently under the needle. If the maker’s care instructions or local requirements affect the repair, follow them; otherwise, use common-sense judgement for the item and its intended use.
Set the garment on a flat surface and support the cloth around the tear. A small embroidery hoop can steady some fabrics, but do not stretch the material tight in it. For a tiny opening, a folded towel beneath the cloth can provide a comfortable surface. Keep the mend small enough to address the damage, but wide enough to reach fabric that can hold stitches.
Choose thread with care. Cotton thread can suit many woven cotton fabrics, while a polyester sewing thread may be useful for garments that need more give or durability. These are broad starting points, not universal pairings. A scrap from the garment or a hidden hem can help you judge colour and how the thread behaves before committing.
If you are uncertain, make a few loose trial stitches in an inconspicuous place or on a matching scrap. Check whether the cloth puckers and whether the thread pulls comfortably through it. Remove the trial stitches if they leave an unwanted mark.
Check the mend in motion
Once the repair is sewn, look at both faces of the fabric. The surrounding cloth should lie reasonably flat, with no sharp knot or loop likely to snag. Gently flex the area as the garment would move during wear. If the mend feels rigid, pulls the fabric into folds or catches on an adjoining layer, adjust it before relying on the garment.
For a garment that will be washed, consider how the repair will meet its usual care routine. Secure loose thread ends and avoid leaving long loops. A hand wash or machine wash setting should follow the garment’s instructions rather than a guess based on the mend alone.
After wearing the item, a quick look can show whether the edges have begun to pull or the thread has loosened. Repairing a small problem while the surrounding fabric is still sound may leave more options than waiting until the opening spreads. For a small fabric tear, choose a patch when the cloth needs broad support and darning when a flexible thread bridge can hold; the best mend is the one that works with the fabric’s shape and the place it has to move.